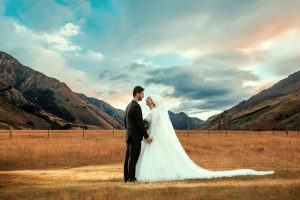
Wedding photography requires precision, creativity, and technical expertise. Shooting in manual mode gives you full control over your camera settings, ensuring that every moment—from the bride’s first look to the reception dance—looks stunning. In this guide, we’ll cover the best camera settings for wedding photography, helping you capture sharp, well-lit, and beautifully composed images in various lighting conditions.
Why Shoot in Manual Mode for Weddings?
Manual mode allows you to:
-Control exposure – No overexposed highlights or underexposed shadows.
-Adjust depth of field – Ensure proper subject isolation.
-Set the right shutter speed – Freeze motion or add a creative blur.
-Adapt to different lighting conditions – From bright outdoor ceremonies to dim receptions.
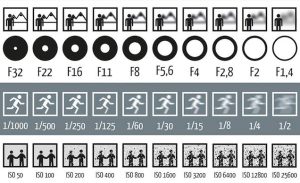
1. Best Camera Settings for Wedding Photography
Aperture (f-stop)
Aperture controls depth of field (DOF). For wedding photography, the ideal settings depend on the situation:
- f/1.8 – f/2.8 → Best for portraits, getting ready shots, and detail photos (rings, flowers).
- f/3.5 – f/5.6 → Ideal for group shots (ensures multiple people are in focus).
- f/8 – f/11 → Perfect for wide venue shots or landscapes (sharpness across the frame).
🔹 Tip: A prime lens (like 50mm f/1.8 or 85mm f/1.4) gives beautiful bokeh for portraits.
Shutter Speed
Shutter speed determines how movement is captured:
- 1/200s – 1/400s → Ideal for portraits and ceremonies (sharp images without motion blur).
- 1/500s – 1/1000s → Needed for action shots (couple dancing, walking, confetti toss).
- 1/60s – 1/125s → Use cautiously in low light with a tripod (to avoid camera shake).
🔹 Tip: Always adjust shutter speed based on movement. For example, a fast-paced reception dance needs at least 1/500s to avoid motion blur.
ISO (Sensitivity to Light)
ISO controls how much light the sensor captures. Keep ISO as low as possible to avoid noise.
- ISO 100 – 400 → Best for outdoor ceremonies in bright sunlight.
- ISO 800 – 1600 → Ideal for indoor weddings with good lighting.
- ISO 3200 – 6400 → Needed for low-light receptions and nighttime shots.
🔹 Tip: If light is too low, first try using a wider aperture (f/2.8 or lower) before increasing ISO.
2. White Balance for Weddings
White balance affects color accuracy:
- Daylight (5200K) → Use for outdoor ceremonies in natural sunlight.
- Cloudy (6000K – 6500K) → Warmer tones for overcast days.
- Tungsten (3200K – 3500K) → Corrects yellow/orange lighting in indoor receptions.
- Custom WB → Use a gray card for accurate white balance in mixed lighting.
🔹 Tip: Shoot in RAW to adjust white balance in post-processing.
3. Best Lenses for Wedding Photography
- 50mm f/1.8 or f/1.4 → Great for portraits and detail shots.
- 85mm f/1.4 or f/1.8 → Ideal for close-up portraits with dreamy bokeh.
- 24-70mm f/2.8 → Versatile for ceremonies and group shots.
- 70-200mm f/2.8 → Perfect for candid moments from a distance.
4. Focusing Mode for Weddings
- Single-Point AF → Best for portraits (precise focus on the eyes).
- Continuous AF (AI Servo / AF-C) → Great for moving subjects (walking down the aisle, dancing).
- Manual Focus → Useful in low-light conditions when autofocus struggles.
🔹 Tip: Use back-button focus for better control during fast-paced moments.
5. Flash & Lighting for Weddings
- On-camera flash → Use a bounce flash (pointed at the ceiling) for softer light.
- Off-camera flash → Perfect for dramatic portraits and reception lighting.
- Reflectors → Help fill shadows for natural light portraits.
🔹 Tip: Use diffusers or softboxes to soften flash light and avoid harsh shadows.
6. Composition & Creative Techniques
- Rule of Thirds → Position subjects slightly off-center for a balanced shot.
- Leading Lines → Use aisles, archways, or pathways to guide the viewer’s eye.
- Negative Space → Emphasize emotion by placing the couple in an open, uncluttered frame.
- Silhouettes → Capture stunning sunset or backlit images.
7. Backup & Storage
- Use dual memory cards → Avoid losing precious moments.
- Shoot in RAW → Maximum flexibility for post-processing.
- Bring extra batteries → Weddings last long—never risk running out of power!
Final Thoughts
Shooting a wedding in manual mode gives you complete creative control. By mastering aperture, shutter speed, and ISO, you can adapt to any lighting condition and capture unforgettable moments. With the right gear, focus settings, and composition techniques, you’ll deliver stunning wedding photos that the couple will cherish forever.